# Proxmox VE
# Sauvegarde et restauration de VM
#### [https://doc.ataxya.net/books/proxmox-ve/page/sauvegarde-et-restauration-de-vm](https://doc.ataxya.net/books/proxmox-ve/page/sauvegarde-et-restauration-de-vm)
# Ajouter un node avec des VMs a un cluster (en cours)
#### [https://doc.ataxya.net/books/proxmox-ve/page/ajouter-un-node-avec-des-vms-a-un-cluster-%28en-cours%29](https://doc.ataxya.net/books/proxmox-ve/page/ajouter-un-node-avec-des-vms-a-un-cluster-%28en-cours%29)
# Installation
#### [https://belginux.com/installer-proxmox/](https://belginux.com/installer-proxmox/)
**Merci Belginux pour ton travail et ta mise à disposition pour la communauté - ([https://belginux.com](https://belginux.com/))**
# Commandes utiles
#### [https://github.com/Tontonjo/proxmox/blob/master/commands.md](https://github.com/Tontonjo/proxmox/blob/master/commands.md)
# Toolbox
#### [https://www.youtube.com/watch?v=p9yXI3Ym6So](https://www.youtube.com/watch?v=p9yXI3Ym6So)
####
#### [https://github.com/Tontonjo/proxmox\_toolbox](https://github.com/Tontonjo/proxmox_toolbox)
####
#### Démo toolbox : [https://www.youtube.com/watch?v=p9yXI3Ym6So](https://www.youtube.com/watch?v=p9yXI3Ym6So)
#### Info de licence OFF : [https://www.sysorchestra.com/remove-proxmox-5-3-no-valid-subscription-message/](https://www.sysorchestra.com/remove-proxmox-5-3-no-valid-subscription-message/)
# Teachmemore Formation
#### [https://www.youtube.com/playlist?list=PLgfd8XL0dJ23y7iGY4is3GGqdvE\_utQKy](https://www.youtube.com/playlist?list=PLgfd8XL0dJ23y7iGY4is3GGqdvE_utQKy)
# Certificat SSL
#### Post FB : [https://www.facebook.com/groups/664652587069498/permalink/1784824755052270](https://www.facebook.com/groups/664652587069498/permalink/1784824755052270)
####
#### [https://blog.zwindler.fr/2018/05/29/signez-la-console-proxmox-ve-avec-lets-encrypt-cest-encore-plus-trivial/?fbclid=IwAR0FoOIFRDARwnarY-KTKvAVmpw-TJLTv7orWFd00eSEGb3rAJFTw8G3INY](https://blog.zwindler.fr/2018/05/29/signez-la-console-proxmox-ve-avec-lets-encrypt-cest-encore-plus-trivial/?fbclid=IwAR0FoOIFRDARwnarY-KTKvAVmpw-TJLTv7orWFd00eSEGb3rAJFTw8G3INY)
# Reverse - Proxy
#### [https://caddyserver.com/docs/quick-starts/reverse-proxy?fbclid=IwAR1gCxXcf0xBuVQvvuMU\_GFtftRx5wb-BA26OTpagkn11bLF0WwFPJcqvSs](https://caddyserver.com/docs/quick-starts/reverse-proxy?fbclid=IwAR1gCxXcf0xBuVQvvuMU_GFtftRx5wb-BA26OTpagkn11bLF0WwFPJcqvSs)
#### [https://www.it-connect.fr/configurer-nginx-en-tant-que-reverse-proxy/?fbclid=IwAR04DAGnBb5WR0UHJmpVNpDD6x-NByr9IzWNVk-NxKhlRMcEw4s9wXBztZw](https://www.it-connect.fr/configurer-nginx-en-tant-que-reverse-proxy/?fbclid=IwAR04DAGnBb5WR0UHJmpVNpDD6x-NByr9IzWNVk-NxKhlRMcEw4s9wXBztZw)
# Sécurisation basique de son Proxmox
#### [https://doc.ataxya.net/books/proxmox-ve/page/securisation-basique-de-son-proxmox](https://doc.ataxya.net/books/proxmox-ve/page/securisation-basique-de-son-proxmox)
# Installer Debian 12 sur VM
#### Attention, il faut désactiver KVM.
Accédez à votre machine virtuelle dans "options".
Désactivez ensuite la « virtualisation matérielle KVM ».
# Helper Scripts
#### [https://tteck.github.io/Proxmox/](https://tteck.github.io/Proxmox/)
# Documentation Index
#### [https://pve.proxmox.com/pve-docs/index.html](https://pve.proxmox.com/pve-docs/index.html)
# Changer l'IP de Proxmox
Changer l’adresse IP d’un serveur Proxmox c’est possible. Mais il y a quelques trucs à savoir.
On peut faire la modification dans l’interface mais il y a des chances que cette modification soit pas prise en charge dans le terminal ou console.
On va faire deux modifications qui changeront le deux.
Voici les 2 fichiers qu’il faut modifier:
`/etc/network/interfaces
/etc/hosts
`Ce troisième fichier est juste si le serveur est dans un cluster:
**`/etc/pve/corosync.conf (only on one node necessary)`**
Dans le shell ou le terminal, on édite le fichier `/etc/network/interfaces` avec la commande suivante:
**`sudo nano /etc/network/interfaces`**`
`
Le fichier devrais ressembler à ce qui suit:
`auto lo
iface lo inet loopback
iface enp3s0 inet manual
auto vmbr0
iface vmbr0 inet static
address 192.168.178.149/24
gateway 192.168.178.254
bridge-ports enp3s0
bridge-stp off
bridge-fd 0`
Dans notre exemple la nouvelle adresse IP du serveur est `192.168.100.200`, on change donc juste ce qui suit dans le fichier `/etc/network/interfaces` :
`address 192.168.100.200/24
gateway 192.168.100.254`
Une fois les modifications faite, on enregistre avec les touche **“Ctrl” + “o”** et on quitte le avec les touches **“Ctrl” + “x”**.
on édite le deuxième ficher avec la commande:
`sudo nano /etc/hosts`
Le fichier devrais ressembler à ce qui suit:
`127.0.0.1 localhost.localdomain localhost
192.168.178.149 NAS.Serveur.org NAS
#The following lines are desirable for IPv6 capable hosts`
`::1 ip6-localhost ip6-loopback
fe00::0 ip6-localnet
ff00::0 ip6-mcastprefix
ff02::1 ip6-allnodes
ff02::2 ip6-allrouters
ff02::3 ip6-allhosts`
Ici aussi on change l’adresse IP par la nouvelle `192.168.100.200`, comme ce qui suit:
`192.168.100.200 NAS.Serveur.org NAS`
Une fois les modifications faite, on enregistre avec les touche **“Ctrl” + “o”** et on quitte le avec les touches **“Ctrl” + “x”**.
Ce dernier fichier est le fichier qui affichera dans le terminal ou la console du serveur l’adresse IP et le port au quel il faut se connecter. **Si on ne change pas ce dernier fichier, ce qui s’affichera sur l’écrans ne fonctionnera pas. **Dans une modification par la page web de Proxmox, il est fort possible que cette dernière modification soir pas faite!
---
**Source :** [https://www.youtube.com/watch?v=9VrNl7MCyYw&ab\_channel=StoyanCheresharov](https://www.youtube.com/watch?v=9VrNl7MCyYw&ab_channel=StoyanCheresharov)
# Désactiver OTP sur Proxmox en SSH
Une fois connecté en SSH a votre machine Proxmox, passer en root :
Créer une copie de votre fichier user ( on ne sait jamais ! ) :
Code:
```
cp /etc/pve/user.cfg /etc/pve/user.cfg.old
```
Code:
```
nano /etc/pve/user.cfg
```
Code:
```
user:mon_user@pam:1:0:::mon_user@mail.com::x!oath:
```
Code:
```
user:mon_user@pam:1:0:::mon_user@mail.com:::
```
1. [Installer Proxmox](https://belginux.com/guide-proxmox/#installer-proxmox)
2. [Ajouter un disque sous Proxmox](https://belginux.com/guide-proxmox/#ajouter-un-disque-sous-proxmox)
3. [Créer une VM avec Proxmox](https://belginux.com/guide-proxmox/#cr%C3%A9er-une-vm-avec-proxmox)
4. [Installer Proxmox Backup Server](https://belginux.com/guide-proxmox/#installer-proxmox-backup-server)
5. [Sauvegarder ses données avec Proxmox Backup Server](https://belginux.com/guide-proxmox/#sauvegarder-ses-donn%C3%A9es-avec-proxmox-backup-server)
6. [Tutoriel pour supprimer local-lvm sur Proxmox](https://belginux.com/guide-proxmox/#tutoriel-pour-supprimer-local-lvm-sur-proxmox)
7. [Augmenter la taille de la partition de sa VM](https://belginux.com/guide-proxmox/#augmenter-la-taille-de-la-partition-de-sa-vm)
8. [Envoyer ses données chiffrées en ligne sur Proxmox Backup Server et activer la 2FA](https://belginux.com/guide-proxmox/#envoyer-ses-donn%C3%A9es-chiffr%C3%A9es-en-ligne-sur-proxmox-backup-server-et-activer-la-2fa)
9. [Supprimer les kernels obsolètes de Proxmox facilement](https://belginux.com/guide-proxmox/#supprimer-les-kernels-obsol%C3%A8tes-de-proxmox-facilement)
10. [Installer Proxmox Backup Server sur Debian 12 Server](https://belginux.com/guide-proxmox/#installer-proxmox-backup-server-sur-debian-12-server)
11. [Installer Windows 11 sur Proxmox](https://belginux.com/guide-proxmox/#installer-windows-11-sur-proxmox)
**Merci Belginux pour ton travail et ta mise à disposition pour la communauté - ([https://belginux.com](https://belginux.com/))**
# Augmenter la taille d'un CT
1. Connectez-vous à l'interface web de **Proxmox**.
2. Cliquez sur le **conteneur** LXC.
3. Cliquez sur Ressources.
4. Cliquez sur le disque (probablement "Disque racine")
5. Cliquez sur Action du volume.
6. Cliquez sur Redimensionner.
**Source :** [https://www.reddit.com/r/Proxmox/comments/14kfqkh/ctvm\_run\_out\_of\_space\_how\_to\_add\_more/?tl=fr](https://www.reddit.com/r/Proxmox/comments/14kfqkh/ctvm_run_out_of_space_how_to_add_more/?tl=fr)
# Ajouter un disque dur
#### [https://belginux.com/ajouter-un-disque-a-proxmox/](https://belginux.com/ajouter-un-disque-a-proxmox/)
**Merci Belginux pour ton travail et ta mise à disposition pour la communauté - ([https://belginux.com](https://belginux.com/))**
# Créer une VM
#### [https://belginux.com/creer-une-vm-avec-proxmox/](https://belginux.com/creer-une-vm-avec-proxmox/)
**Merci Belginux pour ton travail et ta mise à disposition pour la communauté - ([https://belginux.com](https://belginux.com/))**
# Ports utilisés
Si vous modifiez le port SSH, utilisez le même port sur tous les serveurs du cluster au risque d’avoir des surprises.
| Services | Protocole | Ports |
|---|
| Web interface | TCP | 8006 |
| SSHd | SSH | 22 |
| pvedaemon (en écoute) | TCP | 85 |
| rpcbind | TCP | 111 |
| corosync multicast (pour les clusters) | UDP | 5404, 5405 |
| SPICE proxy | TCP | 3128 |
# Htop
#### [https://www.it-connect.fr/visualiser-et-gerer-les-processus-sous-linux-avec-htop/](https://www.it-connect.fr/visualiser-et-gerer-les-processus-sous-linux-avec-htop/)
---
[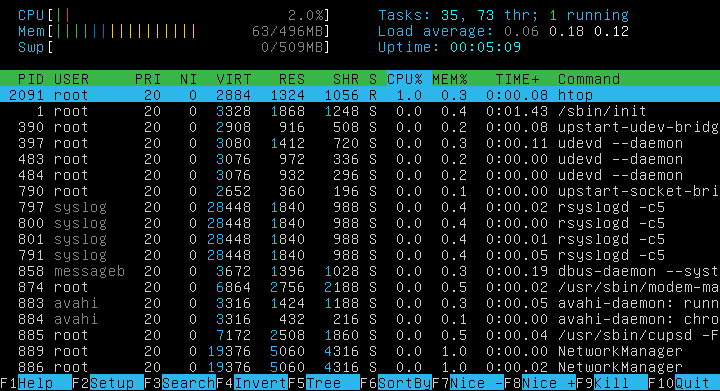](https://doc.techteam-yvl.com/uploads/images/gallery/2024-12/IbhCflupwICbGEYr-image-1734893617934.png)
**Installation :**
```
apt-get install htop
```